Rockwell Tactical Group RTG1 Target
by Jared of Rockwell Tactical Group.
Targets are important tools, and when used correctly, can greatly aid your marksmanship and improve your combat effectiveness. Using other training aids, like steel targets, also aids in training. There is a time and place for all types of targets. From bulls-eyes to real-imagery shoot/no-shoot targets. From different shapes to Zombie targets, they all have a place in quality training. The key is to know how to maximize your training time and ammo. A lot of money can be wasted throwing lead down range, so why not use that ammo in the most effective way possible?
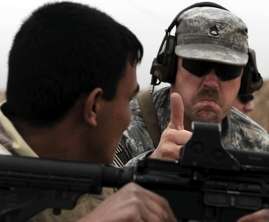
Originally, the military used bulls-eye targets which are fine for practicing marksmanship, but it is important to shoot at a human shape if there is a chance of a lethal encounter. The military found this out during the Vietnam War, where many of our soldiers were not mentally and psychologically prepared to shoot an enemy. It is important to prepare for combat, whether on the battlefield or defending your home. So, you need the experience of shooting a silhouette and walking up to the target to see your handiwork. Some of the PTSD experienced by individuals is because the first time they did that was with a real threat. Dave Grossman author of On Killing and On Combat goes into great detail in his books on this very subject.
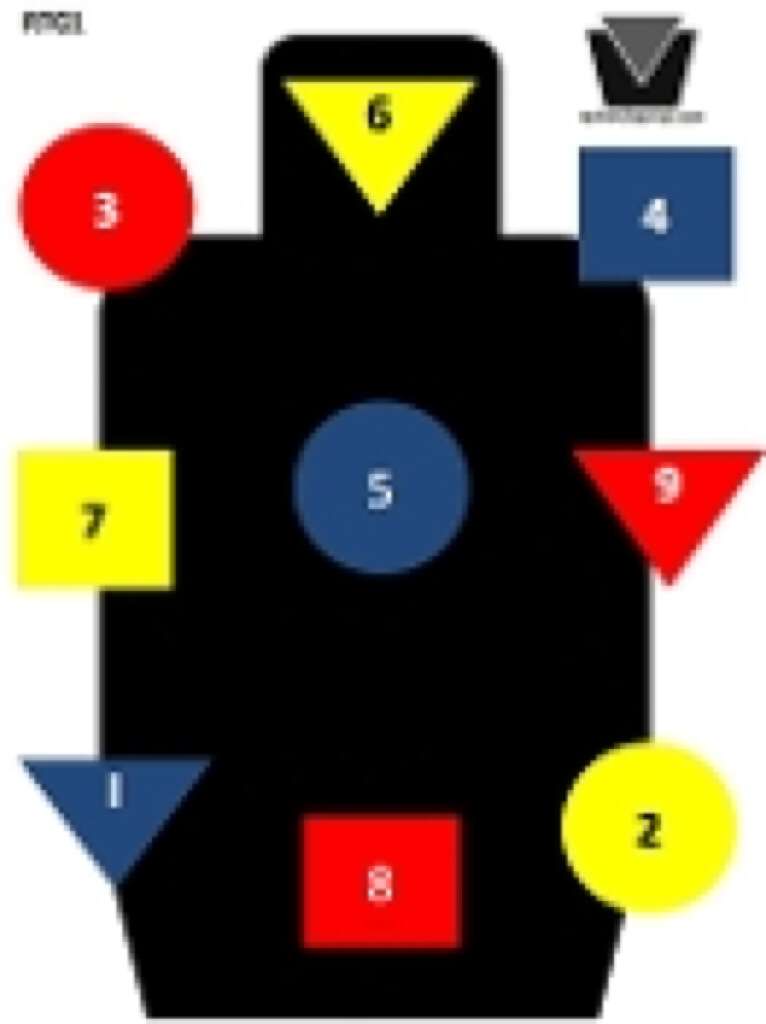
 The Rockwell Tactical Group 1 target is an extremely useful tool designed by an 18B, or Green Beret weapons sergeant. It was created to make the most out of a target and improve the quality of training. As was stated before, it is psychologically important to shoot at an image that represents a man. With that in mind the heart and soul of the target is a solid black silhouette.
The target has 9 discretionary sub-targets for use in command training. The 9 sub-targets are solid shapes, filled with the 3 primary colors, red, yellow, and blue. The shapes are arranged and numbered in random order with black and white numbers for further discretionary ID. This is important to the combat shooter because It gives the one being trained exterior stimulus by way of the commands. The shooter does not know what the next threat will be and has to react to what is said. Then they must ID the proper target and engage to neutralize the threat.
In addition to the random shapes, a few shapes have been specifically placed on the silhouette. The triangle on the head represents the “Cranial Triangle” the area between the ears and upper lip. A shot to the Central Nerves System (CNS) in the cranial triangle area will kill instantly, stopping the threat from any harmful act. A shot to other parts of the head can still be a kill shot, but there may be enough brain activity for the threat to get off one more shot or trigger the explosive device or whatever. The next shape strategically placed is the circle in the chest is center mass, over the heart and lungs. This, too, is a kill shot. The square is set over the groin or femoral arteries. This area is often overlooked however, some threats may be wearing body armor, or helmets and a shot to the femoral arteries will have the threat bleed out in seconds.

As was said before, different types of targets can greatly aid your training. There is a certain satisfaction to shooting a glass bottle, or milk jug filled with water, and watching it explode, but in this day and age of high ammo prices, you need to get the most for your buck. The RTG1 target is just that, an effective training aid to help you along your path of combat marksmanship.

You are limited only by your imagination with the number of different drills you can do with the RTG1 target. Here are a few of our favorites:
3-2-2 Drill
The first is a simple one using just a single target and we call it “3-2-2 drill”. You can start anyway you like, low ready, high ready, facing toward or away from the target. You can be at nearly any distance to the target but the closer you are the more movement you will do. On command, drive the gun to the chest and put 3 rounds in, then drive the gun to the head and put 2 rounds. Finish by driving the gun to the groin and put 2 rounds. The thought process behind the body, head, groin, is because more and more of the threats overseas are starting to wear body armor and even helmets. This drill will help get the muscle memory to go for the groin shot to hit the femoral arteries. As you start doing this drill try to get all the hits in the respective shape. After you are able to do that, then work on your time. Speed it up. Then the next step is to have all your hits land on the number that is in the center of each respective shape. The more definitive or smaller the intended target is, the more accurately you will shoot.
The Chase
The next drill we call “The Chase” and with this drill the shooter must keep track of the number of rounds shot. If we train by just using controlled pairs, then when it counts you will not keep shooting till the threat is eliminated. Again with this one you can start anyway you like. On command the shooter puts 2 rounds in the shape or number specified by the instructor. Before the second shot is fired the next random shape is called out. The shooter must identify and put 3 rounds in this one. Before the last shoot is fired a new shape or number is called out. This one is to receive 4 rounds and only hits count, so the shooter must keep firing until the correct number is reached. In this fashion the shooter chases the targets while the person calling out the target description is responsible to keep the pace manageable for the shooting ability of the person doing the drill. After running out of rounds in the magazine, the shooter does a speed reload and continues the drill. You have now reached the apex of your number of rounds per target. Now finish the drill by going down in count and if you did 6 rounds on the last shape you should do 5 on the next. Continue going down till you again run dry on ammo.
Elimination
The last drill that we will talk about is called “Elimination”. Set up 3 RTG1 targets. The middle target set between 7 to 15 meters away and the other 2 targets should go on each side. Put these between 25 to 35 meters away. They don’t need to be the same distance. To start the drill it’s much the same as “the chase” and you are only shooting at the shapes that are called out on the close target in the middle. This is to take the shooters mind off of the other 2 targets. The Shooter is only thinking about shapes when, at a random moment, the instructor yells “threat”. At that moment, no matter where the shooter is at in his firing sequence on the middle target, he must identify which of the outer 2 targets is the biggest threat. Place 5 rounds in the silhouette as fast as possible to eliminate the threat, then drive the gun to the other outer target and place another 5 rounds in the silhouette to eliminate it. The drill is finished by driving the gun to the center target and placing 5 rounds into it. Do any magazine changes as necessary to complete the drill. This drill is good in teaching aggressive shooting and driving the gun.
As stated before the RTG1 target is an excellent tool to be used in all aspects of combat shooting and training. It’s potential as a training multiplier is limited only by your imagination.
-Jared

Check out Rockwell Tactical Group and don’t forget to like their Facebook page